
Mastering Composite Cladding Installation: A Comprehensive Australian Guide
- info512916
- Jun 7
- 13 min read
What if the secret to a flawless, high-performance exterior isn't actually the board itself, but the hidden gaps you leave behind? When you are preparing for composite cladding installation, it is easy to focus on the aesthetic finish while overlooking the critical engineering required to withstand the Australian climate. We understand the frustration of seeing boards warp under the intense sun or the confusion that often surrounds the latest National Construction Code updates. You want a result that reflects your commitment to quality without the looming threat of structural rot or compliance failures.
This guide provides the professional techniques and technical insights needed to install premium composite cladding with absolute confidence. We will explore the mandatory ventilated wall cavity requirements for Climate Zones 6, 7, and 8 introduced in the NCC 2025 and clarify the exact batten spacing required for thermal expansion. By the end of this article, you will have a clear roadmap for achieving a seamless finish that meets every Australian standard. It is time to ensure your facade remains as resilient and beautiful as the day it was installed.
Key Takeaways
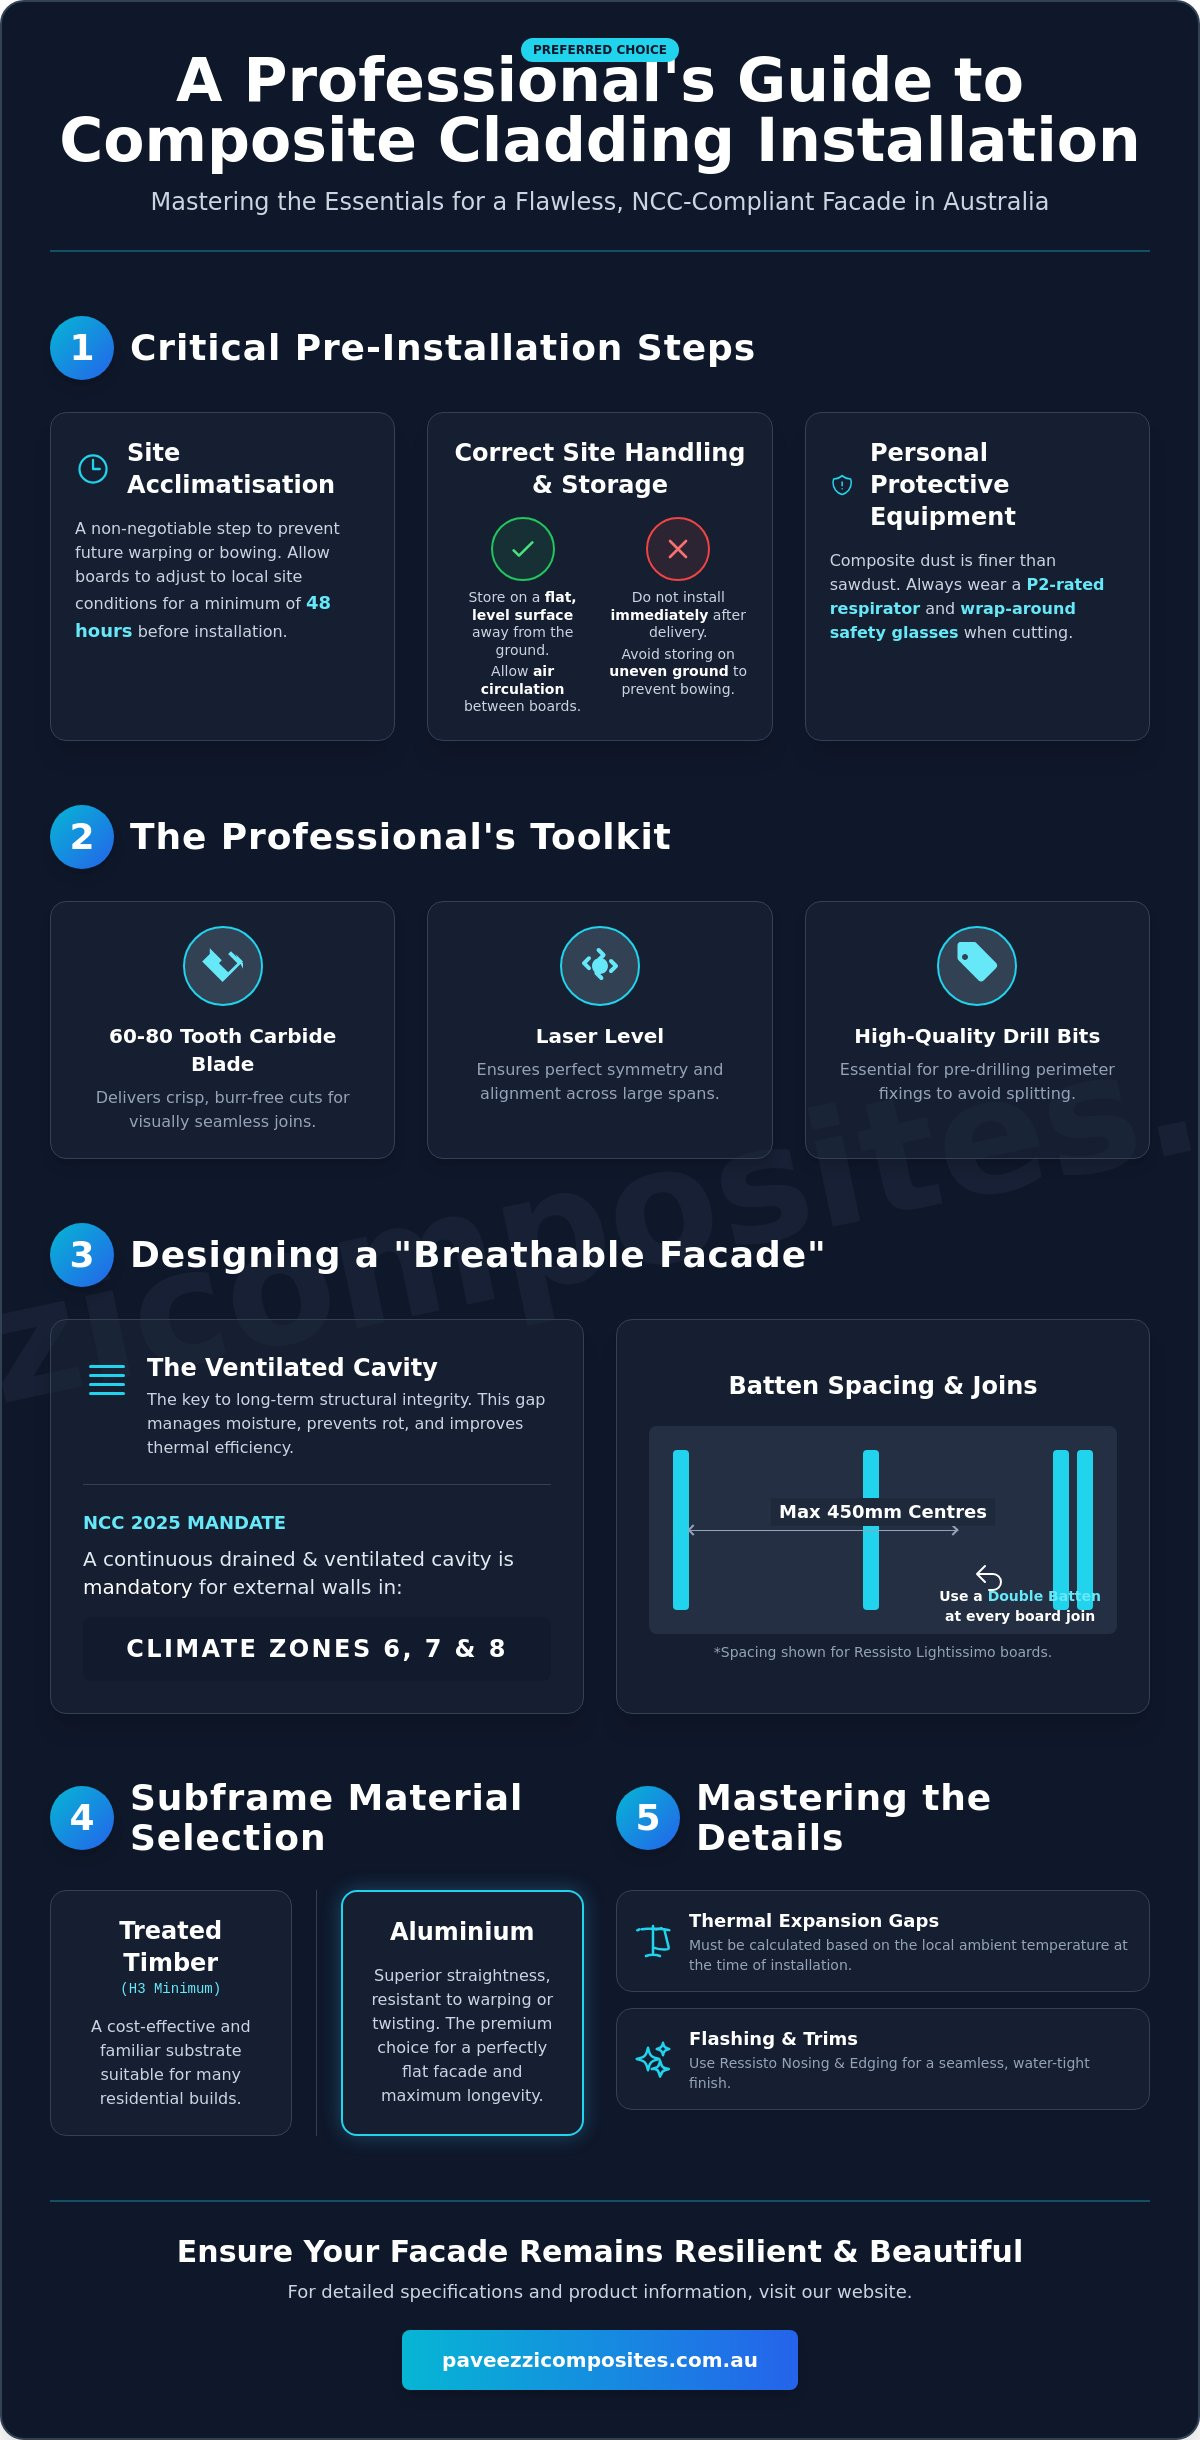
Understand why site acclimatisation for at least 48 hours is a non-negotiable step to prevent future board warping or bowing.
Discover how to engineer a "Breathable Facade" using ventilated cavities to ensure long-term structural integrity and moisture control.
Master the technical requirements when preparing for composite cladding installation, including calculating expansion gaps based on local ambient temperatures.
Learn the correct flashing and trimming techniques using Ressisto Nosing and Edging options for a seamless, water-tight finish.
Implement a practical maintenance protocol to protect your investment and maintain the aesthetic of brushed or matte finishes.
Table of Contents
Essential Preparation and Tools for Composite Cladding
A professional finish is a direct result of meticulous groundwork. Success begins long before the first board is fixed to the frame. When you are preparing for composite cladding installation, the initial 48 hours after delivery are the most critical for the long-term performance of the facade. Understanding the fundamental role of Cladding (construction) in protecting a building's envelope helps highlight why these steps cannot be skipped. Composite materials are engineered for extreme durability, yet they remain sensitive to thermal changes during the transition from the delivery truck to your specific site environment.
Safety is paramount. Cutting composite materials produces a very fine dust that is more intrusive than standard sawdust. You should always wear a P2-rated respirator and wrap-around safety glasses to protect yourself. Set up your cutting station in a well-ventilated area to keep your workspace clear and your lungs protected. It is these small, disciplined choices that separate a DIY effort from a trade-quality result.
Acclimatisation and Site Handling
Stack your Ressisto boards in a way that allows air to circulate between the layers. This ensures a uniform temperature across the entire batch, preventing hot spots that could lead to uneven expansion once installed. You must store boards on a flat, level surface away from direct contact with the ground. If they are left on uneven terrain, they can develop a permanent bow that makes achieving a flush finish nearly impossible. Never install boards immediately after delivery, especially during periods of high humidity. When moving long-length boards, always use two people. Carrying a six-metre board alone can cause it to flex excessively, leading to surface scuffing or even structural snapping.
The Professional Tool Kit
Your toolkit defines the quality of the final facade. While some suggest standard woodworking tools are enough, we recommend a more specialised approach for a truly premium result. Use a laser level to establish your datum line; a spirit level is helpful, but a laser ensures perfect symmetry across large spans. High-quality drill bits are essential for pre-drilling perimeter fixings to avoid splitting the material. For profiles like the Cladding Ressisto 144 Fineline, a 60 to 80-tooth carbide blade on your mitre saw will deliver the crisp, burr-free edges that define a professional Australian project. This high tooth count prevents the chipping often seen with standard blades, ensuring your joins remain tight and visually seamless.
Designing a Robust Subframe: The Foundation of Your Facade
A premium facade is only as reliable as the structure supporting it. While the visual appeal of the boards is often the focus, the subframe acts as the essential skeleton that ensures long-term performance. When you are preparing for composite cladding installation, you must look beyond the surface to engineer a system that manages moisture and thermal movement effectively. This is particularly vital under the latest National Construction Code (NCC), which now mandates continuous drained and ventilated cavities for external walls in Climate Zones 6, 7, and 8. Ignoring these ventilation requirements is a risk that can lead to trapped moisture, structural rot, and reduced thermal efficiency.
Choosing the right material for your battens depends on your project's specific demands. Treated timber (minimum H3 rating) remains a popular, cost-effective choice for many residential builds, providing a familiar substrate for fixing. However, aluminium battens are becoming the preferred option for high-end projects due to their superior straightness and resistance to environmental degradation. Aluminium won't warp or twist, ensuring that your facade remains perfectly flat over decades of exposure to the Australian sun. Regardless of the material, your subframe must provide a stable, level plane for the boards to rest upon.
Batten Spacing and Alignment
Structural integrity relies on correct spans. For Ressisto Lightissimo boards, we recommend maximum batten centres of 450mm to prevent any sagging or deflection over time. If you are opting for a vertical installation, your battens must run horizontally, which requires careful planning to ensure drainage isn't obstructed. Use shims or packers behind the battens to correct any deviations in the wall studs. A perfectly flat wall is the goal. At every board join, you must install a double-batten. This provides a wider fixing surface, ensuring both board ends are fully supported while allowing for the necessary expansion gaps.
Moisture Management and Airflow
The "Breathable Facade" principle is your best defence against the elements. Before fixing your battens, install a high-quality, breathable sarking layer to act as a secondary water barrier. This layer allows internal vapours to escape while preventing external moisture from reaching the frame. By using battens that are at least 20mm thick, you create a dedicated air cavity that facilitates natural convection. This airflow regulates the temperature of the boards and allows any incidental moisture to drain away safely. Always install vermin mesh at the base and top of the cavity to keep the space clear of pests without restricting air movement. To see how these engineering principles pair with premium aesthetics, explore our full range of Ressisto cladding profiles designed for the Australian climate.
Step-by-Step Installation: Horizontal and Vertical Techniques
Precision during the physical fixing stage transforms a standard project into an architectural statement. When you are preparing for composite cladding installation, calculating thermal expansion is your most critical task. Australian summers are unforgiving. A board installed on a 15°C morning will expand significantly when the afternoon sun hits 38°C. You must leave a precise expansion gap at every butt join and perimeter. As a general rule, we recommend a 1mm clearance for every metre of board length, though you should always cross-reference this with the specific temperature-adjustment table provided with your batch to ensure long-term stability.
The starter strip is the anchor of your entire project. If this first component is even slightly out of level, the error will compound as you move up the wall, resulting in a visible slant at the eaves or around windows. Use your laser level to set a perfect horizontal datum before any boards are fixed. Once the starter strip is secured, the first board locks into place, providing the foundation for every subsequent layer. This methodical approach ensures symmetry across the entire facade, creating the clean lines that define high-end construction.
Securing the boards requires a delicate touch and the right hardware. We utilise hidden clips that slide into the side grooves, creating a premium, screw-free finish that architects and homeowners prefer. This system doesn't just look better; it's engineered to allow the boards to expand and contract without buckling or stressing the fixings. Avoid the temptation to over-tighten the screws into the battens. The clips should hold the board firmly but allow for the slight, natural movement that composite materials require to maintain their integrity through seasonal shifts.
Horizontal Cladding Execution
Setting the first board correctly ensures the next decade of performance. Interlock the tongue-and-groove system firmly, but don't force it. Each board should click into the clips with minimal resistance. To achieve a natural, high-end look, stagger your joins across the facade. Ensure that butt joins on adjacent rows are separated by at least two batten spans. This prevents unsightly vertical lines from forming, which can detract from the seamless, organic aesthetic of the finished wall.
Vertical Cladding Considerations
Vertical layouts offer a striking modern profile, but they require a different subframe logic. For the Ressisto 144 Fineline, you must install horizontal battens to provide fixing points. Ensure there is a 10mm drainage gap at the bottom of each board to prevent moisture from pooling against the trim. We often recommend a top-down approach for vertical installs. This ensures full-width boards at the roofline, where they are most visible, while any necessary cuts remain discreetly at the base of the structure.
Mastering the Details: Trims, Corners, and Flashings
The difference between a functional facade and a masterpiece lies in the resolution of the edges. While the main body of the wall provides the canvas, the trims and flashings provide the frame. When you are preparing for composite cladding installation, you must decide on your detailing strategy early, as this dictates how you set out your battens and board lengths. A common industry mistake is treating trims as an afterthought, yet these components are vital for both water management and the finished architectural aesthetic. By planning your corner junctions and window reveals from the outset, you ensure the final result looks intentional rather than assembled.
Managing board ends requires a choice between efficiency and a bespoke finish. While many standard projects rely on simple L-trims to cover cut edges, a premium Australian home often demands more sophisticated treatment. For a truly high-end look, you might choose to mitre the boards at external corners, though this requires extreme precision and a stable subframe to maintain the join over time. Where hidden clips cannot be used, such as at the very top of a wall or around complex architectural features, always use colour-matched screws. These fixings disappear into the surface, maintaining the clean, uninterrupted lines of the facade while providing the necessary structural security.
External and Internal Corners
Achieving the signature "Fineline" look at corner junctions requires a disciplined approach to cutting. We recommend using F-trims for internal corners and H-trims for transitions between different board sections to create professional, clean lines. These profiles don't just hide the cut ends of the boards; they provide a dedicated channel that allows for thermal movement. When you are preparing for composite cladding installation, ensure the boards have at least 5mm of clearance within the trim channel. This prevents the material from bottoming out and buckling during the peak of an Australian summer, preserving the integrity of the entire system.
Aperture Detailing: Windows and Doors
Windows and doors are the most vulnerable points for water ingress in any building envelope. You must integrate Z-flashings above every opening to direct water away from the cavity and over the face of the cladding. At the sill, ensure the detail allows water to shed effectively without pooling against the boards or the window frame. The Paveezzi trim system provides a sophisticated, integrated solution that ensures a high-performance 2026 architectural finish for any modern Australian project. To secure the perfect finishing touches for your facade, order your Ressisto Nosing & Edging Options today to ensure a seamless transition across every corner and reveal.
Long-term Performance and Maintenance in the Australian Climate
The term "maintenance-free" is a common industry exaggeration that we prefer to avoid. While premium composite materials are significantly more durable than traditional timber, every exterior surface requires a basic level of care to preserve its architectural integrity. When you are preparing for composite cladding installation, you are essentially building a high-performance shield for your home. Protecting that investment involves a simple, annual commitment to ensuring the system continues to function as it was engineered to do. A little foresight prevents environmental build-up from dulling the vibrant finish of your facade over the coming decades.
Annual inspections should focus on the critical drainage paths you established during the subframe construction. Check that the 20mm air cavity remains clear of debris and that the vermin mesh at the base hasn't become clogged with leaf litter or dust. You should also examine the flashings around windows and doors to ensure they are still shedding water effectively. These small checks ensure that the "Breathable Facade" principle continues to protect your structural frame from moisture and heat. It's about maintaining the system's health, not just its surface appearance.
Cleaning and Care
Maintaining the aesthetic of your facade doesn't require harsh chemicals or intensive labour. We recommend a "soft wash" approach using a garden hose and a mild detergent. You must avoid high-pressure cleaners; the intense force can etch the surface of the composite or drive moisture into places it isn't meant to go. For shaded areas where mould or lichen might attempt to take hold, a soft-bristled brush will safely remove organic debris. If you have an outdoor entertaining area, grease or oil spots from a BBQ should be cleaned promptly with warm, soapy water to prevent them from setting into the grain of brushed finishes or the smooth surface of extra matte profiles.
Why Paveezzi Engineering Matters
Our products are specifically engineered to thrive in the volatile Victorian climate. Melbourne is famous for experiencing four seasons in a single day, and this rapid fluctuation in humidity and temperature can be brutal on inferior materials. The Cladding Ressisto Lightissimo 202 is designed with a stable composite core that resists the swelling and contraction cycles that often plague standard timber. This engineering ensures that the expansion gaps you calculated when preparing for composite cladding installation remain consistent and functional.
UV stability is another cornerstone of our production process. The intense Australian sun can cause significant fading in unprotected materials, but our Ressisto range features advanced pigments that maintain their depth of colour through years of high-UV exposure. For a deeper look into how these materials are shaping the future of local design, explore our guide to Architectural Composite Cladding. Choosing a product designed for local conditions means your project will continue to look as striking in ten years as it does the day the scaffolding comes down.
Elevating Your Architectural Vision with Precision
Achieving a world-class exterior is a journey of technical discipline and foresight. By prioritising site acclimatisation and engineering a robust, ventilated subframe, you protect your build against the unique stresses of the Australian environment. We have explored how the latest NCC 2025 standards and meticulous detailing with specialised trims transform a standard wall into a high-performance architectural statement. These steps ensure your facade remains as resilient as it is beautiful.
Success starts with the right materials and a commitment to precision when preparing for composite cladding installation. Since 2010, our family-run Australian business has provided the Ressisto and Riviera product lines, which are meticulously engineered for high UV and thermal stability. We take pride in being a steadfast partner for your construction needs, offering solutions that balance engineering integrity with aesthetic appeal. Explore the Ressisto Cladding Range for Your Next Project and secure a finish that stands the test of time. Your vision deserves a legacy of excellence.
Frequently Asked Questions
Do I need to pre-drill composite cladding boards before fixing?
Yes, you must always pre-drill any perimeter fixings where our hidden clip system isn't being utilised. Because our composite boards are engineered for high density, forcing a screw directly into the material can lead to surface mushrooming or structural splitting. Pre-drilling a pilot hole slightly larger than the screw shank provides the necessary clearance for the board to expand and contract naturally without stressing the fixing point. It's a small step that ensures a professional, lasting result.
How much expansion gap should I leave between composite boards in Australia?
You should typically allow for an expansion gap of 1mm for every metre of board length. When you are preparing for composite cladding installation, it's vital to account for the ambient temperature during the build. If you're installing in the peak of a Victorian summer, the boards are already expanded; in winter, they will need more room to grow when the sun eventually hits the facade. Always refer to our specific temperature-adjustment table to ensure your joins remain stable year-round.
Can I install composite cladding directly onto a brick or masonry wall?
No, composite cladding should never be fixed directly to brick or masonry surfaces. You must install a subframe of treated timber or aluminium battens to create a dedicated ventilation cavity. This gap is essential for moisture drainage and thermal regulation. Without it, trapped heat and dampness can compromise both the cladding's performance and the structural integrity of your wall over time. This "Breathable Facade" principle is a non-negotiable part of modern Australian building standards.
Is composite cladding suitable for BAL-rated bushfire zones in Victoria?
Suitability depends entirely on the specific Bushfire Attack Level (BAL) assigned to your property. In Victoria, construction in bushfire-prone areas must comply with AS 3959. While many composite products are suitable for lower BAL ratings, higher levels like BAL-40 or BAL-FZ often require non-combustible materials. We recommend consulting with your building designer or local council to ensure our Ressisto range meets the specific compliance requirements for your site's bushfire risk category.
What is the best way to cut Ressisto 144 Fineline boards without chipping?
Use a high-quality, carbide-tipped mitre saw blade with a tooth count between 60 and 80 for the cleanest results. This high density of teeth ensures a crisp cut on the Cladding Ressisto 144 Fineline profile without the ragged edges or chipping often caused by standard timber blades. Always cut with the decorative face up and maintain a steady, controlled pace through the material. This technique ensures the sharp, architectural lines that define a premium Paveezzi installation.
How do I manage water drainage in a vertical cladding installation?
Effective drainage in vertical layouts is achieved by installing your horizontal battens with frequent gaps or by using a counter-batten system. This ensures that any moisture behind the boards can flow freely to the base of the wall. You must also leave a minimum 10mm clearance at the bottom of the boards to prevent water from pooling against the trims. This allows the cavity to remain dry and ventilated, preventing the structural rot that can occur in poorly managed vertical systems.
Do I need to paint or seal my Paveezzi composite cladding after installation?
No, Paveezzi composite cladding is a factory-finished product that never requires painting, staining, or sealing. The colour and UV inhibitors are deeply integrated into the material during manufacturing. This is a core benefit of our engineering, providing a long-term aesthetic that resists the fading and peeling associated with traditional timber. When you are preparing for composite cladding installation, you can rest assured that once the boards are up, the hard work of finishing is already done.
Can I use standard timber screws for my Paveezzi cladding projects?
We strongly advise against using standard timber screws for your facade. You should use our specialised hidden clip system for the main body of the wall to allow for natural thermal movement. For perimeter fixings where clips aren't possible, choose high-grade stainless steel screws with colour-matched heads. Standard screws often lack the corrosion resistance required for harsh Australian conditions and can cause unsightly staining or mechanical failure as the boards expand and contract over time.


Comments